25 Christmas Paper Crafts
The holidays are the perfect time to get creative with paper crafts. Whether you’re decorating your home, making gifts, or just enjoying some festive fun with family, these paper projects bring Christmas cheer without breaking the bank. You probably already have most supplies at home—scissors, glue, colorful paper, and a bit of imagination.
From delicate snowflakes to cheerful Santa faces, these crafts work great for kids and adults alike. They’re simple enough for beginners but can be made as detailed as you want. Plus, handmade decorations add a personal touch that store-bought items just can’t match.
1. Paper Snowflakes in Various Patterns
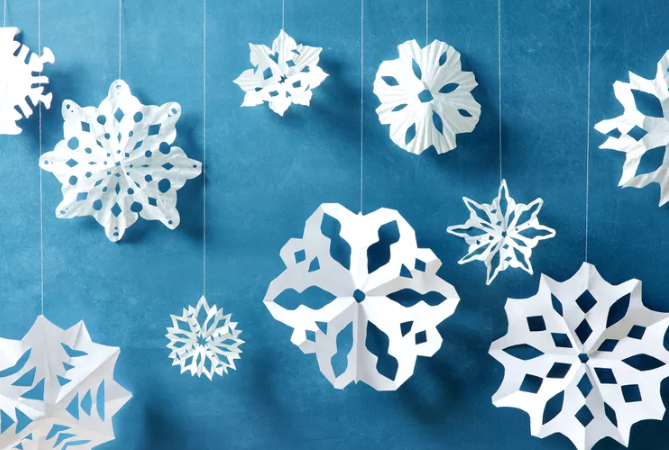
These classic decorations never go out of style. Fold white or blue paper into quarters or eighths, then cut out different shapes along the edges and folds. When you unfold the paper, you’ll reveal intricate, symmetrical snowflake designs. Each one turns out unique depending on your cuts. Make them large for windows or tiny for hanging on the tree. The best part is experimenting with different folding techniques and cut patterns to create everything from simple geometric shapes to elaborate lacy designs. Hang them with clear thread for a floating effect.
2. 3D Paper Christmas Trees
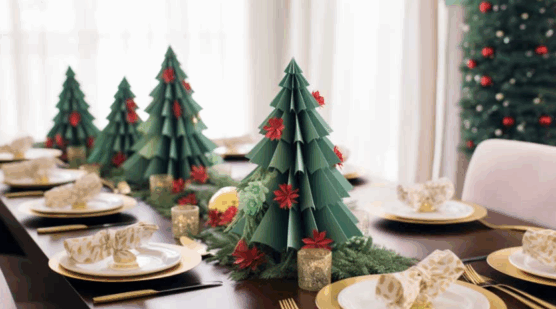
These stand-up trees add dimension to your holiday display. Cut out multiple tree shapes from green cardstock in graduated sizes. Stack and glue them together with small spacers in between, or fold each tree in half and glue the halves together to create a dimensional effect. The layered look gives them a full, realistic appearance.
Decorate with tiny paper stars, sequins, or dots of glitter glue. They look fantastic on mantels, shelves, or as table centerpieces. You can make a whole forest in different sizes and shades of green for visual interest.
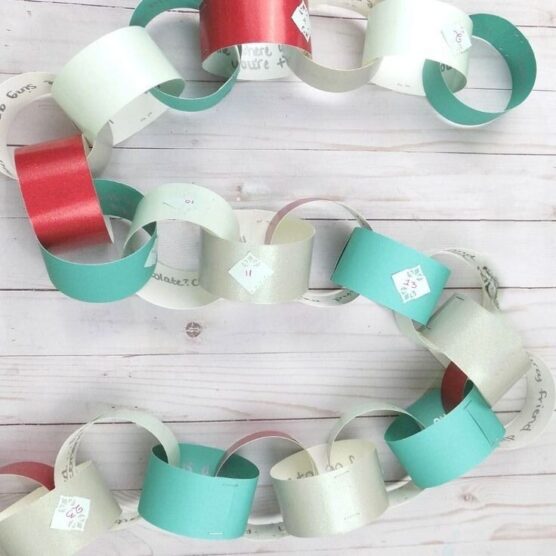
3. Paper Chain Garlands in Festive Colors

This is one of the easiest crafts that even young kids can help with. Cut strips of red, green, white, and gold paper about an inch wide and six inches long. Loop one strip into a circle and glue or tape the ends. Thread the next strip through the first loop before connecting its ends. Keep going until your chain reaches the length you want.
Drape these garlands across doorways, along banisters, or around the Christmas tree. The interlocking loops create a cheerful, old-fashioned decoration that brings back nostalgic memories of childhood Christmases.
4. Origami Santa Claus Figures
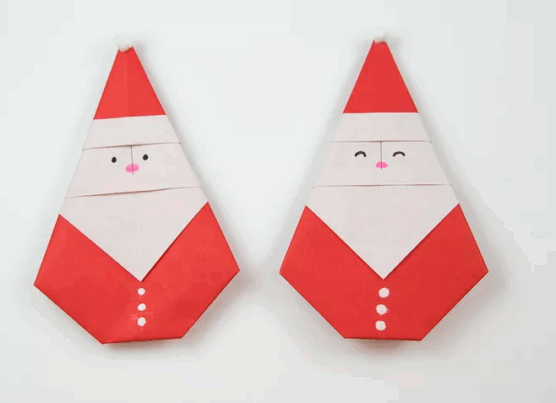
These little folded Santas are adorable and surprisingly easy once you get the hang of the technique. Start with red origami paper or any red square. Follow basic origami folding steps to create Santa’s body and hat, then add a small white paper beard and face details with markers.
The triangular hat sits perfectly on top of the folded body. These miniature Santas work wonderfully as gift toppers, place card holders, or tree ornaments. Make several in different sizes to create a Santa family. Kids love displaying their origami skills with these festive figures.
5. Paper Ornaments for the Tree
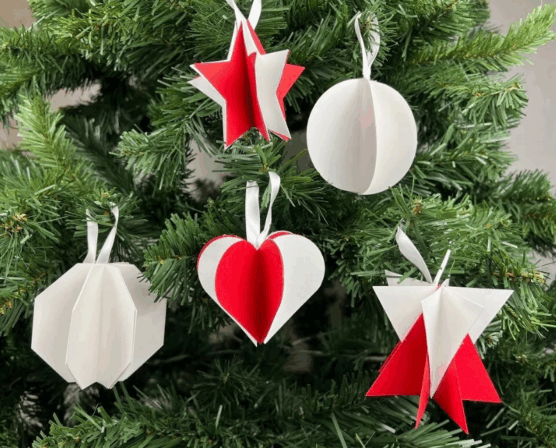
Homemade paper ornaments bring personality to your Christmas tree. Cut circles, stars, bells, or other holiday shapes from patterned scrapbook paper or cardstock. Layer different papers for added interest, or fold paper into accordion pleats and arrange them in circular medallion shapes. Punch a hole at the top and thread ribbon through for hanging.
Decorate with glitter, stickers, or hand-drawn designs. You can even write names and dates on them to create keepsake ornaments that capture memories year after year. They’re lightweight so they won’t weigh down branches.
6. Handmade Christmas Cards

Nothing beats a card made with your own hands. Fold cardstock in half to create the card base, then get creative with the front design. Layer cut-out Christmas trees, snowmen, or wreaths using different colored papers. Add ribbon bows, paper snowflakes, or stamped messages. Write personal greetings inside that show you care.
The time you spend crafting each card makes them special gifts themselves. Recipients always appreciate the effort and thought behind handmade cards. Make extras to have on hand for last-minute gift-giving or unexpected visitors during the season.
7. Paper Plate Wreaths

Paper plates provide the perfect base for festive wreaths. Cut out the center of a paper plate, leaving just the rim. Cover this ring with torn pieces of green tissue paper or construction paper to create a leafy texture. Add red paper berries, a big red bow, or other decorative elements. You can also use handprints cut from green paper and arranged around the ring for a kid-friendly version.
Hang your wreath on doors, walls, or windows. These are great classroom projects because each child can personalize their wreath with different decorations and color combinations.
8. Paper Angels with Accordion-Fold Wings
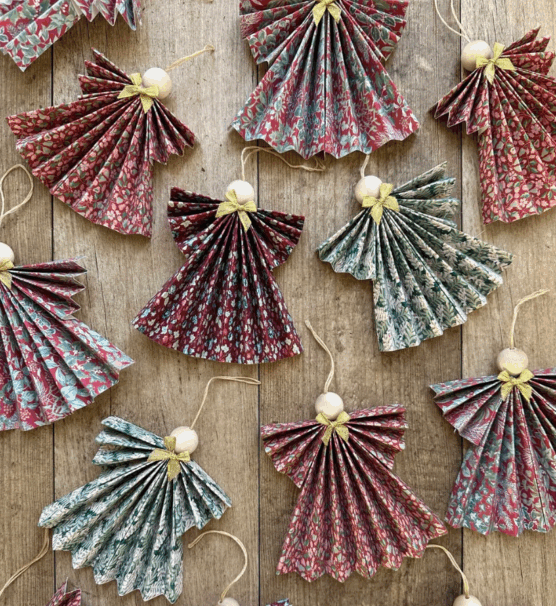
These delicate angels have a lovely vintage charm. Cut a circle from cardstock for the head and a cone shape for the body. Fold two pieces of paper accordion-style for the wings, then fan them out and attach to the body. Draw a sweet face on the head and add yarn or paper curls for hair.
A paper halo completes the heavenly look. These angels can stand on surfaces or hang from the tree. The pleated wings catch the light beautifully and add movement when they sway. Make them in white, gold, or pastel colors for different effects.
9. Paper Gingerbread House Decorations
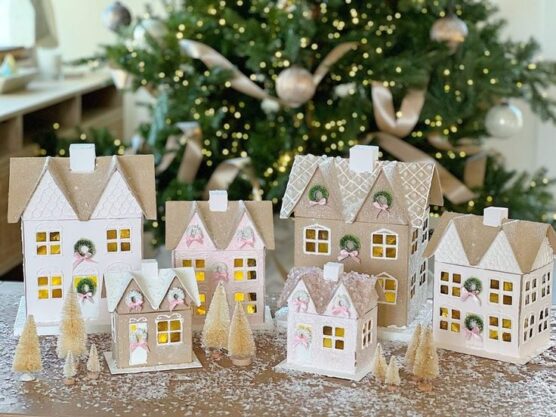
Create gingerbread houses without any baking required. Cut house shapes from brown cardstock or paper bags to get that gingerbread color. Draw on windows, doors, and candy decorations with markers, or glue on paper cutouts that look like gumdrops, peppermints, and icing trim. Add white paint or correction fluid for snow on the roof.
These flat decorations work great for cards, wall hangings, or gift tags. If you want three-dimensional houses, fold and glue tabs to create stand-up versions. Kids love decorating them as elaborately as they’d decorate real gingerbread houses.
10. Tissue Paper Pom-Pom Ornaments

These fluffy balls add soft texture to your holiday decor. Stack several sheets of tissue paper together and accordion-fold them lengthwise. Tie the center tightly with string or wire, leaving extra for hanging. Cut the ends into rounded or pointed shapes. Carefully separate each layer of tissue paper, fluffing it outward to create a full, round pom-pom.
Use traditional red, green, and white, or try metallic tissue paper for extra sparkle. Hang them in windows, from light fixtures, or on the tree. They’re incredibly lightweight and create beautiful visual impact with minimal materials.
11. Paper Star Lanterns
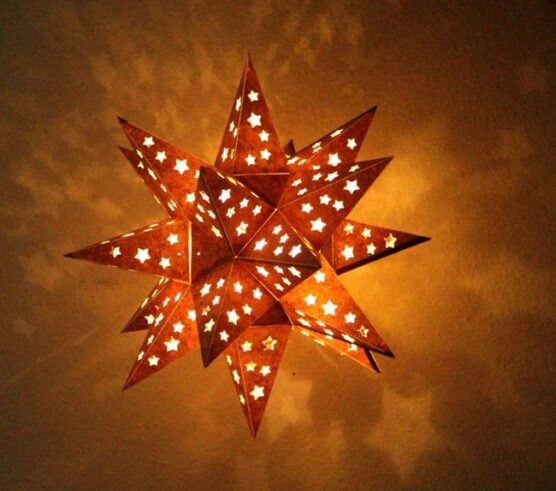
These geometric stars glow beautifully when lit from within or behind. Fold and cut paper to create three-dimensional star shapes with points that extend outward. You can make them from a single sheet using specific folding techniques, or glue multiple pointed pieces together. Poke small holes in the surface to let light shine through in patterns.
Hang them near windows where sunlight can illuminate them during the day, or place them near string lights for evening ambiance. The angular shapes and interplay of light and shadow make these stars look more complex than they actually are to make.
12. Rolled Paper Christmas Trees
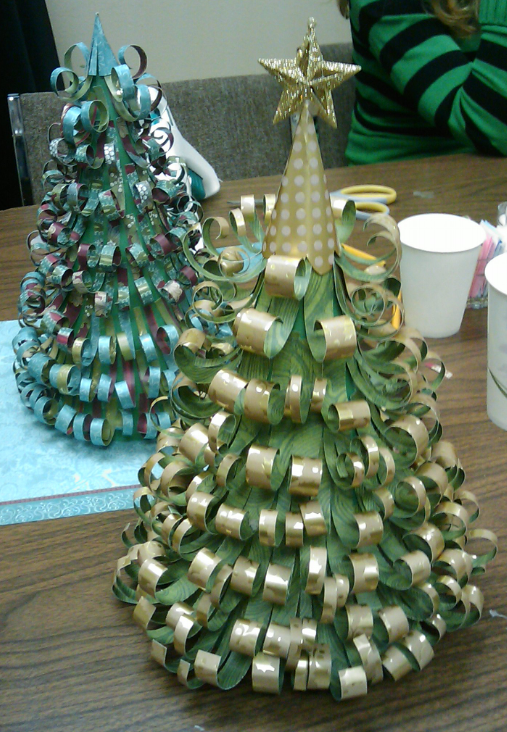
These textured trees have an interesting spiral look. Cut green paper into thin strips of varying lengths. Roll each strip tightly around a pencil or dowel, then release slightly to create a coiled shape. Glue the coils onto a cone-shaped base, starting from the bottom with the longest coils and working up to shorter ones at the top.
The rolled paper creates depth and dimension that catches the eye. Top with a paper star. These trees look modern and artistic, quite different from traditional Christmas decorations. The rolling technique is meditative and fun, making it a relaxing craft activity.
13. Paper Strip Balls

These spherical ornaments look complex but come together pretty easily. Cut multiple strips of paper the same length—usually eight to twelve strips work well. Stack them together and punch holes through both ends. Thread a string or brad through both holes to connect all the strips at their ends.
Gently pull the strips apart, arranging them evenly in all directions to form a sphere. The result is an open, airy ball ornament with a modern sculptural quality. Try using gradient colors or metallic paper for extra impact.
14. Origami Cranes
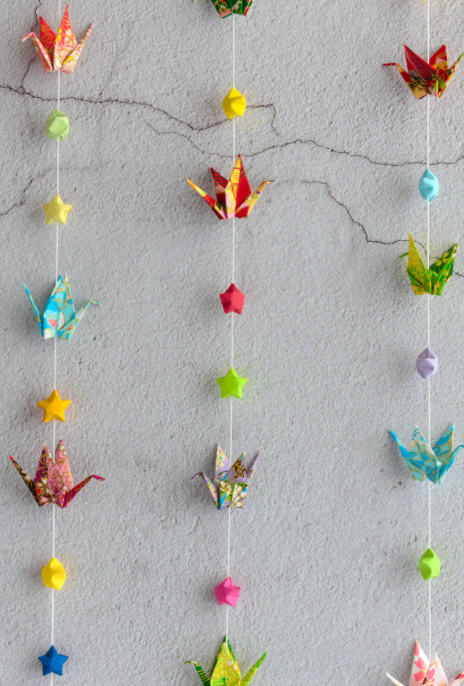
Traditional origami cranes bring elegance and meaning to your holiday décor. Fold several cranes using origami paper or any thin, square sheet that creases well. Once finished, thread them together on a clear string or twine, spacing them evenly for a balanced look.
Hang the garland along your mantel, wall, or doorway for a delicate, handcrafted accent. Mix papers in metallic, pastel, or patterned finishes to add a festive touch. The graceful wings and long tails catch the light beautifully—especially when paired with fairy lights or greenery for a serene, artistic display.
15. Paper Bag Reindeer Puppets
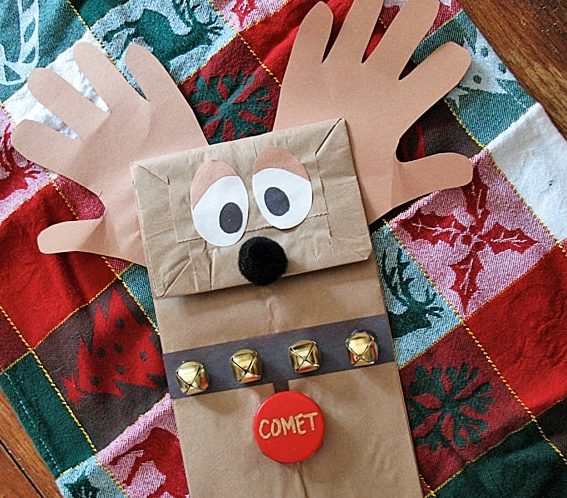
Brown paper lunch bags become adorable reindeer puppets in minutes. Keep the bag folded flat and decorate the bottom flap as the reindeer’s face. Glue on googly eyes, a red pom-pom or paper nose, and construction paper antlers. The mouth of the bag becomes the puppet’s mouth when you slip your hand inside.
Kids can put on Christmas puppet shows or use them as decorative treat bags. Add a jingle bell collar for extra festivity. These puppets combine craft time with playtime, keeping children entertained long after the decorating is done.
16. Paper Spiral Christmas Trees

These dimensional trees start flat but become sculptural when assembled. Draw or print a spiral line in a Christmas tree shape, with the spiral starting at the outer edge and working toward the center. Cut along the spiral line, then pull up from the center point—the spiral naturally forms a three-dimensional tree shape.
The continuous line creates interesting negative space and shadow. Use green cardstock and add tiny dots of color for ornaments, or try metallic paper for shimmer. They’re surprisingly stable once formed and look great hanging or standing on flat surfaces.
17. Paper Rosette Wreaths
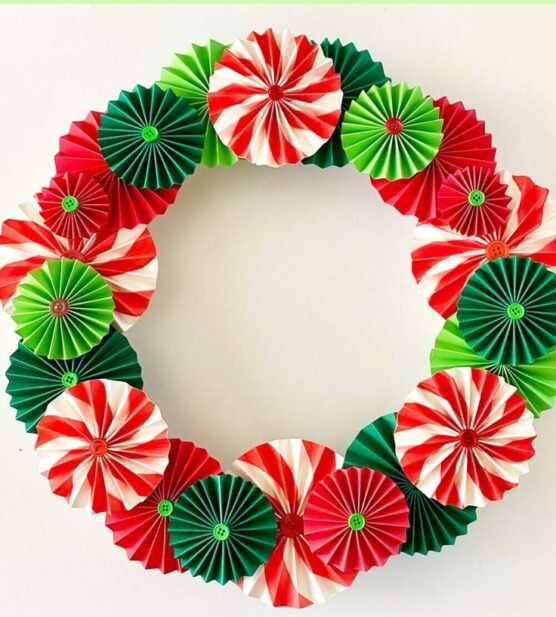
These dimensional wreaths have a flower-like appearance. Create paper rosettes by accordion-folding strips of paper, then joining the ends to form circles. Flatten them slightly and arrange multiple rosettes in a circular pattern on a cardboard base. Use different shades of green for depth, and add red rosettes as berries. The layered, textured look is sophisticated and eye-catching.
These wreaths work beautifully in holiday colors but also look stunning in metallics or winter whites. The repetitive folding and arranging is therapeutic, and the finished product looks impressively professional for something made from simple paper strips.
18. Quilled Paper Snowflakes
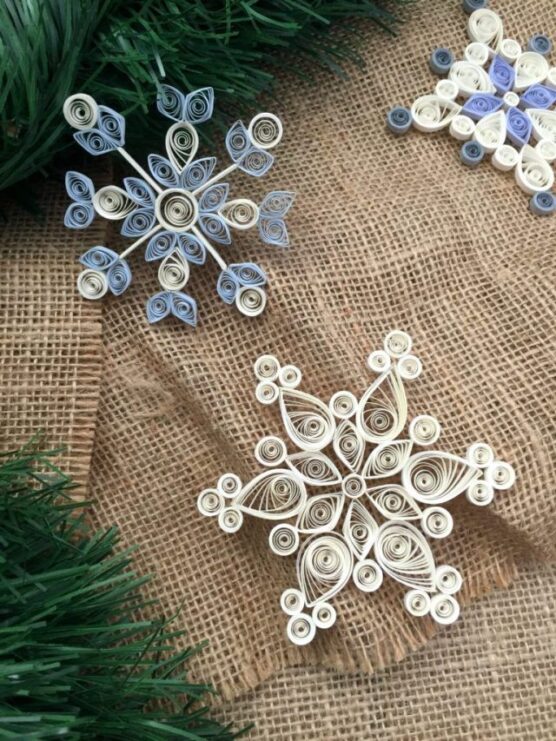
Paper quilling creates incredibly delicate snowflakes with curled and shaped paper strips. Roll thin strips of white or blue paper around a quilling tool or toothpick to create tight coils, teardrops, and other shapes. Arrange these pieces in symmetrical snowflake patterns and glue them together at contact points. The curled edges and three-dimensional quality make these snowflakes look intricate and special.
They’re more time-consuming than cut snowflakes but worth the effort for their beauty. Frame them as art, hang them in windows, or attach them to gift packages as elegant embellishments that show you put care into every detail.
19. Paper Accordion Christmas Trees

The accordion fold gives these trees a pleated, textured appearance. Fold a long piece of green paper back and forth in accordion pleats. Secure one end with tape or glue to create a fan shape, then fold it in half to make a tree that stands up. The wider end becomes the bottom of the tree.
Trim the top to a point and decorate with paper stars, tiny beads, or marker dots representing ornaments. These trees have great visual interest because of their dimensional folds. Make a whole forest in various heights and display them together on a table or windowsill.
20. Paper Fortune Teller Christmas Games
Remember those folded fortune tellers from childhood? Give them a holiday twist. Fold square paper following the classic fortune teller pattern, creating four flaps with pockets underneath. Decorate the outside flaps with Christmas colors, numbers, or holiday symbols. Inside, write Christmas jokes, activities, or fortunes like “You’ll find extra cookies!” or “Time to sing carols!”
Kids love playing with these interactive paper toys. They work as party activities, stocking stuffers, or countdown games for the days before Christmas. The nostalgia factor makes adults smile too when they remember making these as children.
21. Paper Plate Santa Faces
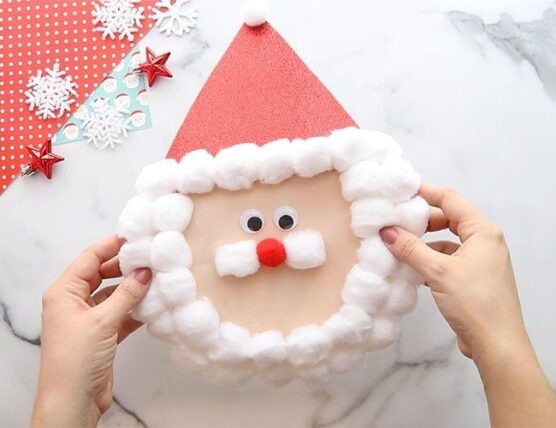
Paper plates become jolly Santa faces with simple additions. Paint or cover a paper plate with pink or peach paper for Santa’s face. Glue on a red triangle hat at the top, cotton balls for the beard and hat trim, and googly eyes. Add a red pom-pom nose and draw on a smiling mouth.
The circular plate shape is perfect for Santa’s round, cheerful face. These make great kid’s crafts because they’re simple but recognizable. Hang them on walls, use them as party decorations, or attach craft sticks to the back to create Santa masks for dress-up play.
22. Paper Poinsettia Flowers
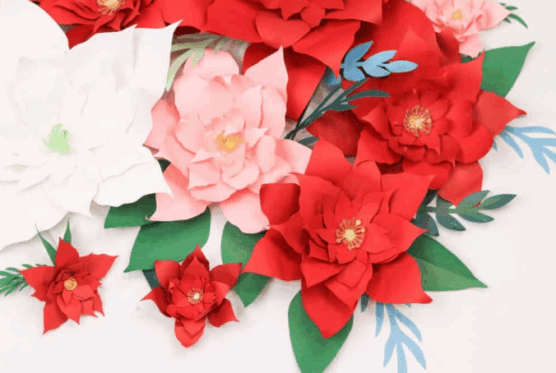
These festive flowers brighten any space. Cut petal shapes from red, pink, or white paper, making some larger than others. Layer the petals in a circular pattern, with the largest on the bottom, creating a flower shape. Glue a yellow paper circle or button in the center. The layered petals create realistic dimension. Attach these flowers to wreaths, garlands, or gift boxes.
You can also glue them onto wire stems to create bouquets. Paper poinsettias last forever unlike their living counterparts, and you can make them in any color combination you like, even non-traditional blues or purples for unique holiday decor.
23. Paper Stocking Gift Holders
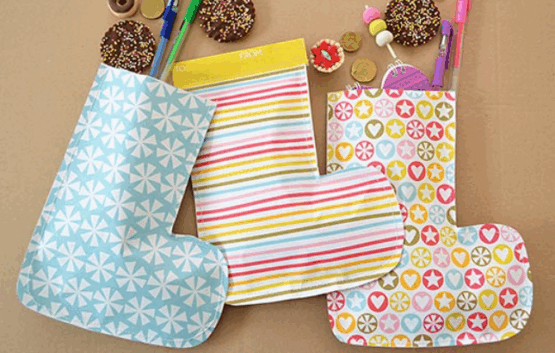
These miniature stockings hold small treats or gifts. Cut two stocking shapes from red, green, or patterned paper. Glue or staple the edges together, leaving the top open. Add a white paper cuff at the top and decorate with markers, stickers, or glitter. Attach a paper loop for hanging. Fill the stockings with candy, small toys, gift cards, or rolled-up money.
Use them as advent calendar pockets, place card holders at holiday dinners, or party favors. Kids can make personalized stockings for each family member. The paper versions are lighter and easier to work with than fabric.
24. Paper Advent Calendar Chains
Count down to Christmas with this interactive paper chain. Make a chain of 24 or 25 loops, one for each day leading up to Christmas. Write activities, treats, or messages inside each loop before sealing it. Each day, tear off one loop and complete the activity or enjoy the surprise inside. Ideas include “make hot cocoa,” “watch a Christmas movie,” or “call someone you love.”
This tangible countdown builds anticipation and creates daily moments of joy. The decreasing chain length shows how close Christmas is getting. Hang it where everyone can reach it and participate together.
25. Paper Holly Leaf Garlands
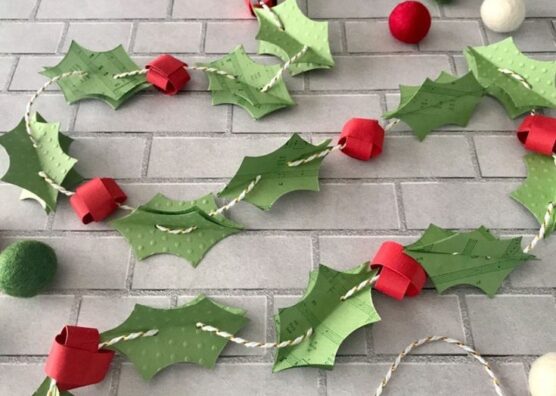
Holly leaves and berries are Christmas classics. Cut leaf shapes from green paper, making sure to include the characteristic pointed edges that holly leaves have. Group three leaves together and add small red paper circles as berries in the center. String these holly clusters together with thread or glue them onto a paper strip to create a garland.
Drape the garland across mantels, doorways, or along banisters. The dark green leaves and bright red berries create the perfect color contrast. Add a light dusting of glitter to mimic frost, or leave them simple for a clean, traditional look.